
วิธีติดตั้งก๊อกน้ำฝังผนัง การตกแต่งห้องน้ำสไตล์ Luxury Minimal ด้วย ก๊อกอ่างล้างหน้าฝังผนัง (Concealed Basin Faucet) เป็นไอเดียที่ช่วยให้เคาน์เตอร์อ่างล้างหน้าดูเรียบหรู สะอาดตา และทำความสะอาดง่าย อย่างไรก็ตาม หัวใจสำคัญที่ทำให้ก๊อกน้ำฝังผนังทำงานได้อย่างสมบูรณ์แบบ ไม่รั่วซึม และมีระยะยื่นที่พอดีกับอ่างล้างหน้า คือ “ขั้นตอนการติดตั้งวาล์วฝังผนังที่แม่นยำ” บทความนี้ WoraSri (วรศรี) จะพาช่างติดตั้งและเจ้าของบ้านไปเปิดคู่มือเจาะลึกขั้นตอนการติดตั้งรุ่นยอดฮิต BF31, BF311 และ BF312 อย่างละเอียด พร้อมแนะนำเทคนิคการเลือกเฉดสีใหม่ล่าสุดอย่าง สีดำด้าน (Matte Black), สีเทาดำ (Gunmetal) และ สีเงินด้าน (Brushed Silver) ที่มาแรงไม่แพ้สีทองเอกลักษณ์ของเรา
อุปกรณ์สำคัญและข้อควรระวังก่อนเริ่มงานติดตั้ง วิธีติดตั้งก๊อกน้ำฝังผนัง
ก่อนที่จะเริ่มสกัดผนังปูน ควรจัดเตรียมเครื่องมือมาตรฐานให้พร้อม ดังนี้:
- ระดับน้ำ (Spirit Level): สำคัญที่สุดในการตั้งบล็อกวาล์วให้ตรง ไม่เอียง
- เทปพันเกลียว (PTFE Tape): สำหรับพันข้อต่อเกลียวน้ำดี
- เครื่องมือตัดปลอกพลาสติก: คัตเตอร์ใบมีดคม หรือเลื่อยตัดพลาสติก
- ผ้าสะอาด: สำหรับรองประแจเลื่อนตอนขันส่วนประกอบภายนอกเพื่อป้องกันผิว PVD Gold, สีดำด้าน (Matte Black) หรือสีเงิน (Brushed Silver) เป็นรอยขีดข่วน
ข้อควรระวังสูงสุด: ต้องทำการ เปิดน้ำไล่เศษกรวด หิน ดิน และสิ่งสกปรกออกจากท่อน้ำดี (Flushing) ก่อนการประกอบตัววาล์วทองเหลืองเสมอ เพื่อป้องกันเศษตะกอนเข้าไปอุดตันทางเดินน้ำหรือทำให้เซรามิกวาล์วภายในเสียหาย
🛠️ ระยะและโครงสร้างการติดตั้ง (ภาพรวม)
การติดตั้งก๊อกฝังผนัง สิ่งสำคัญที่สุดคือ “ความลึกของท่อในผนัง” และ “ระยะห่างจากอ่างล้างหน้า”
ระยะห่างที่แนะนำ: ปลายก๊อกน้ำควรอยู่สูงกว่าขอบบนของอ่างล้างหน้าประมาณ 15 – 20 เซนติเมตร เพื่อให้มีพื้นที่ล้างมือได้สะดวกและน้ำไม่กระเด็น
ความลึกของตัววาล์ว (Rough-in Valve): ต้องฝังเข้าไปในผนังปูนให้พอดี โดยทั่วไปจะฝังลึกประมาณ 5 – 7 เซนติเมตร (ขึ้นอยู่กับสเปกของแต่ละรุ่น) โดยต้องเผื่อความหนาของปูนฉาบและกระเบื้องที่จะปูทับด้วย

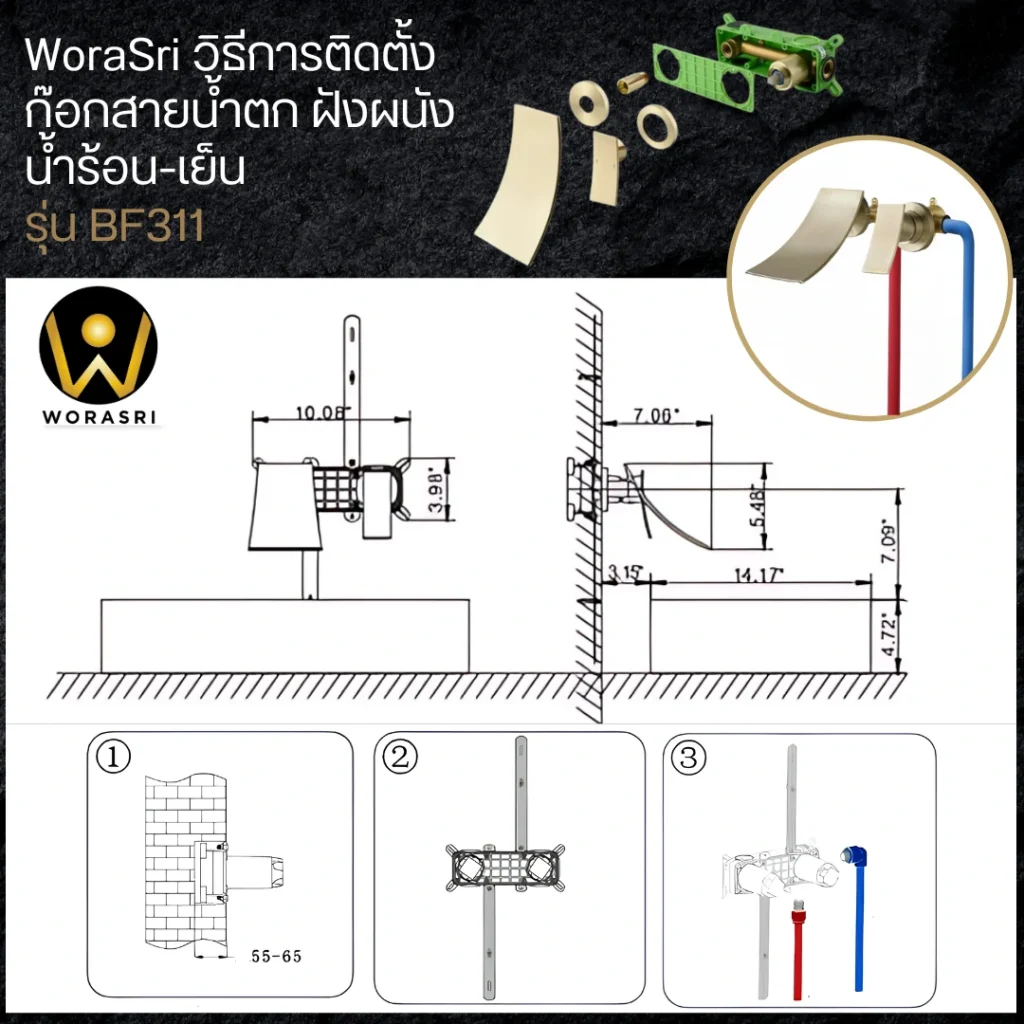

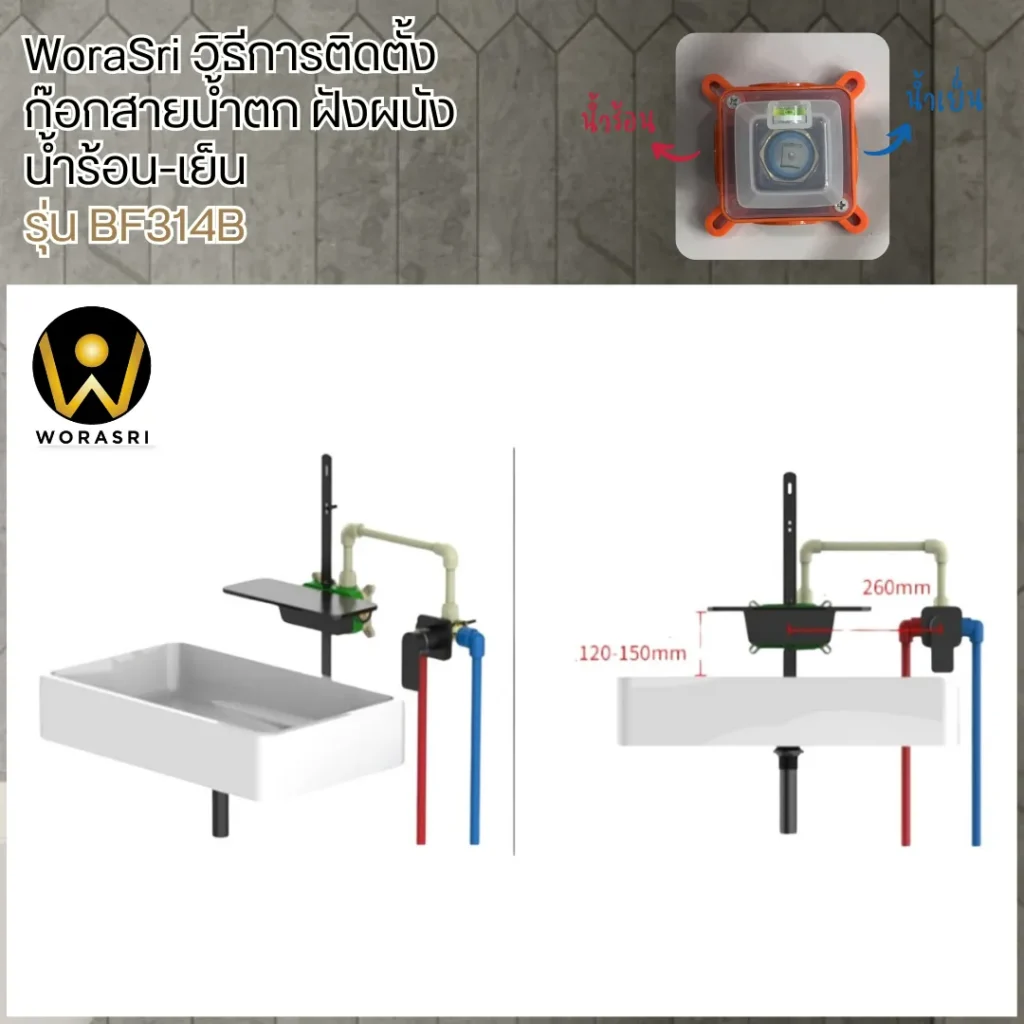
วิธีติดตั้งก๊อกน้ำฝังผนัง WoraSri รุ่น BF31, BF311, BF312, BF314 คู่มือช่างและเทคนิคแมตช์สีโมเดิร์น
การปรับโฉมห้องน้ำให้กลายเป็นพื้นที่สไตล์ Luxury Minimal หรือ Modern Industrial สิ่งหนึ่งที่ขาดไม่ได้เลยคือ ก๊อกอ่างล้างหน้าฝังผนัง (Concealed Basin Faucet) ที่ช่วยลดทอนความเกะกะบนเคาน์เตอร์ ให้ความรู้สึกเรียบหรูและทำความสะอาดง่าย แต่หลายคนมักกังวลเกี่ยวกับ วิธีติดตั้งก๊อกน้ำฝังผนัง ว่าจะมีความซับซ้อน กลัวระยะยื่นไม่พอดี หรือกลัวปัญหาการรั่วซึมในอนาคต
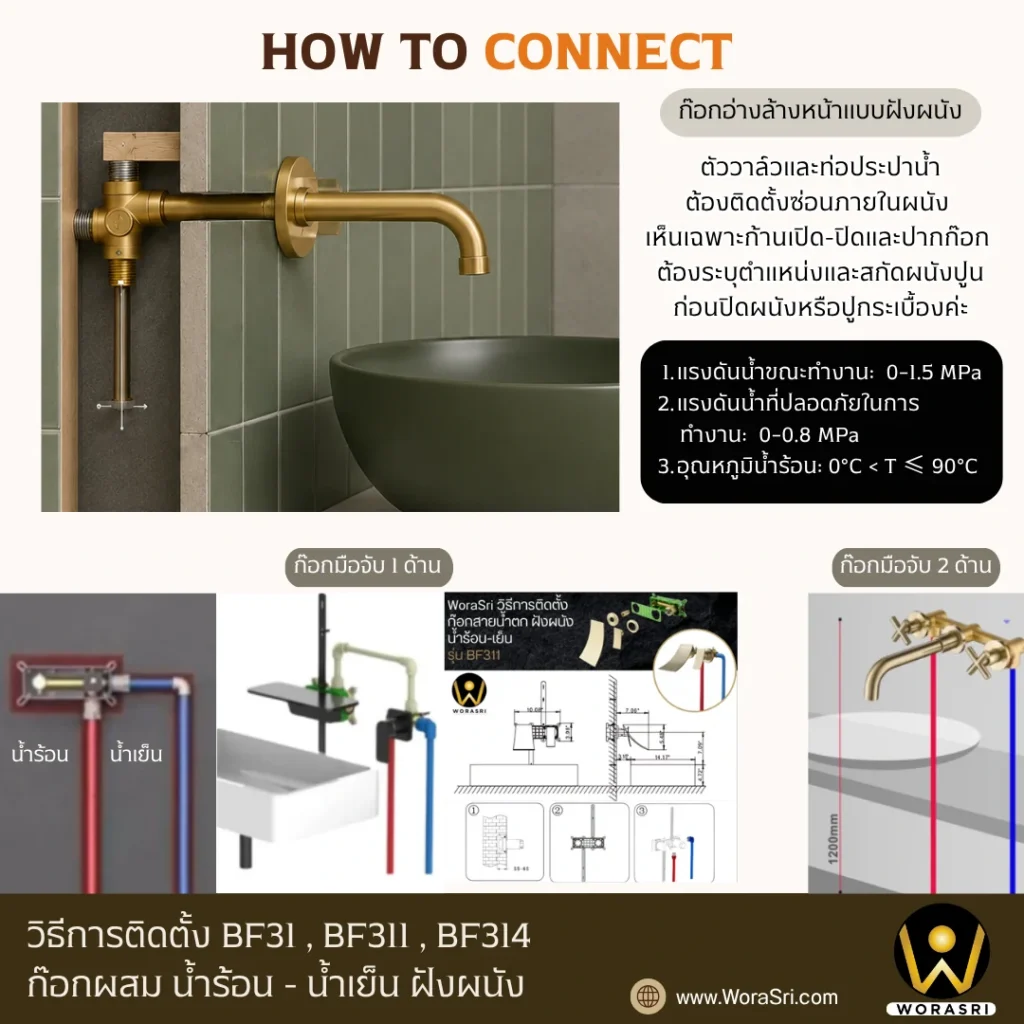
ขั้นตอนที่ 1 การเดินท่อระบบน้ำดีและการฝังบล็อกวาล์ว (Embedded Box) วิธีติดตั้งก๊อกน้ำฝังผนัง
สำหรับรุ่น BF312 และ BF311 จะมาพร้อมกับบล็อกพลาสติกนิรภัย (Embedded Box) เพื่อช่วยป้องกันตัววาล์วทองเหลืองแท้ด้านในและช่วยกำหนดระยะหน้างาน
1.1 การกำหนดระยะความลึกในการฝัง (Embedding Depth) วิธีติดตั้งก๊อกน้ำฝังผนัง
- ดูจากสติกเกอร์หรือสัญลักษณ์เตือนบนพลาสติกครอบวาล์ว จะมีเส้นบอกระยะ MIN และ MAX
- ระยะฝังบล็อกวาล์วที่เหมาะสมจะอยู่ระหว่าง 55 มม. ถึง 70 มม. (วัดจากเนื้อปูนดิบถึงผิวกระเบื้องที่ปูเสร็จสิ้น)
- ใช้ระดับน้ำวัดให้บล็อกวาล์วตั้งฉากทั้งแนวตั้งและแนวนอน จากนั้นยึดบล็อกเข้ากับผนังปูนด้วยพุกและน็อตให้แน่นหนา
1.2 การต่อท่อน้ำดีและทดสอบแรงดัน (Pressure Test) วิธีติดตั้งก๊อกน้ำฝังผนัง
- ต่อท่อน้ำเย็นเข้าที่ฝั่งขวา (สัญลักษณ์สีน้ำเงิน) และท่อน้ำร้อนเข้าที่ฝั่งซ้าย (สัญลักษณ์สีแดง)
- ทำการทดสอบระบบน้ำ (Pressure Test): เปิดวาล์วน้ำทิ้งไว้เพื่อตรวจสอบรอยรั่วซึมตามข้อต่อเกลียวต่างๆ ภายในผนังอย่างน้อย 24 ชั่วโมง ก่อนจะฉาบปูนปิดทับและทำการปูกระเบื้อง
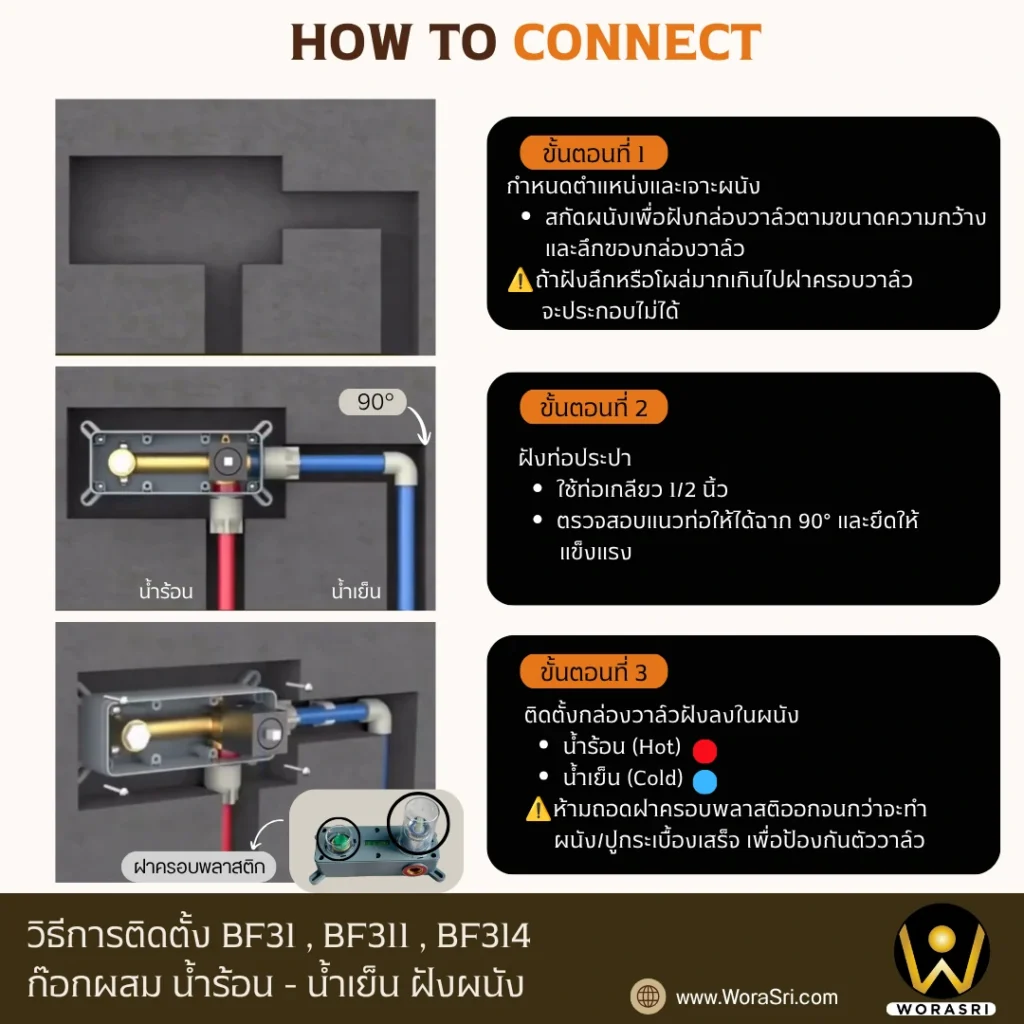
ขั้นตอนที่ 2 การตัดปลอกพลาสติกและการประกอบหน้ากากภายนอก (Trim Kit)
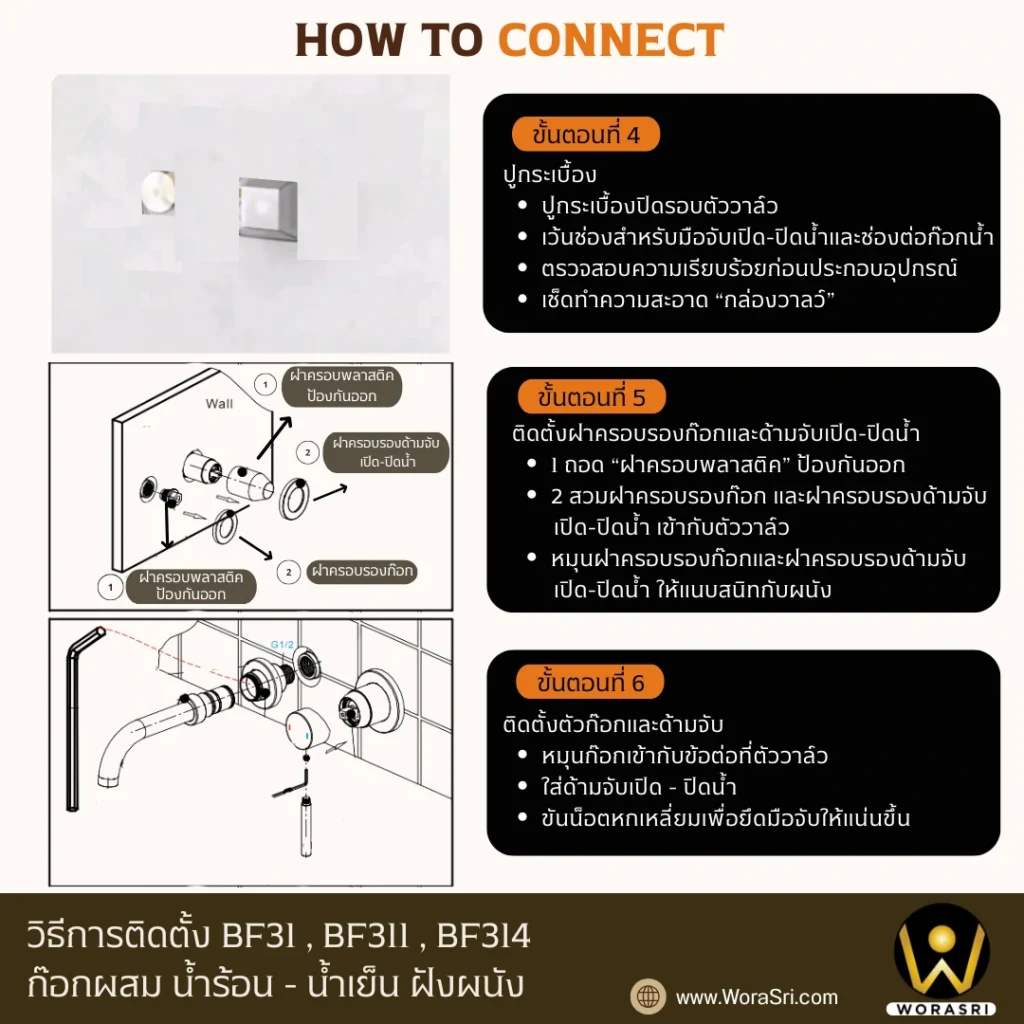
หลังจากที่ช่างทำการปูกระเบื้องผนังห้องน้ำเสร็จเรียบร้อยแล้ว จะเห็นปลอกพลาสติกป้องกันยื่นออกมาจากผนัง ให้ทำตามขั้นตอนดังต่อไปนี้ (อ้างอิงตามคู่มือรุ่น BF312):
2.1 ตัดปลอกพลาสติกให้เสมอแนวหน้ากระเบื้อง
- ใช้คัตเตอร์หรือเครื่องมือตัด ค่อยๆ ตัดปลอกพลาสติกส่วนเกินออก โดยให้ขอบพลาสติก เรียบเสมอกับผิวหน้ากระเบื้องพอดี (ไม่ยื่นออกมาและไม่จมลึกเกินไป)
2.2 การติดตั้งแกนส่งน้ำและฝาครอบ (Spout & Plate)
- นำแกนต่อเกลียวทองเหลืองพันด้วยเทปพันเกลียว หมุนเข้ากับช่องจ่ายน้ำของปากก๊อกให้แน่น
- สวม ฝาครอบหน้ากาก (Plate) เข้าไป โดยทั่วไปด้านหลังฝาครอบจะมีซีลยาง (Gasket) กันน้ำซึมมาให้ในตัว ไม่จำเป็นต้องทากาวตะปูยึดติดกับกระเบื้อง แรงกดจากการขันตัวก๊อกและชุดมือจับจะทำให้ฝาครอบแนบสนิทกับกระเบื้องเอง
- ทริคพิเศษ: หากผิวกระเบื้องมีลวดลายไม่เรียบ (Texture เยอะ) สามารถยิงซิลิโคนใสรอบๆ ขอบฝาครอบบางๆ เพื่อช่วยกันน้ำไหลย้อนเข้าผนังได้
- หมุนประกอบ ปากก๊อก (Spout) และ ชุดมือจับโยก (Handle) เข้ากับแกนวาล์ว ขันน็อตหกเหลี่ยมขนาดเล็ก (Grub Screw) ด้านใต้ให้แน่นหนาเพื่อล็อกตำแหน่ง
FAQ: คำถามที่พบบ่อยเกี่ยวกับ วิธีติดตั้งก๊อกน้ำฝังผนัง WoraSri
- Q: ระยะความสูงในการติดตั้งก๊อกน้ำฝังผนังควรอยู่ที่เท่าไหร่?
- A: โดยมาตรฐาน ระยะความสูงของก๊อกฝังผนัง (วัดจากตำแหน่งปากก๊อก) ควรอยู่สูงกว่าขอบบนของอ่างล้างหน้าประมาณ 15 – 20 เซนติเมตร เพื่อให้มีระยะการล้างมือที่สะดวกและลดการกระเซ็นของน้ำ
- Q: หากในอนาคตวาล์วน้ำมีปัญหาหรือรั่วซึม ต้องทุบกระเบื้องผนังหรือไม่?
- A: ไม่ต้องทุบครับ สินค้าของ WoraSri ออกแบบมาให้มี Embedded Box ซึ่งเมื่อคุณถอดชุดหน้ากากและฝาครอบภายนอกออก คุณจะสามารถขันเปลี่ยนเซรามิกวาล์ว (Cartridge) จากด้านหน้าผนังได้ทันที
- Q: รุ่น BF31, BF311 และ BF312 มีสีอะไรบ้าง และการดูแลรักษาเหมือนกันไหม?
- A: นอกจากสีทอง (Brushed Gold) ที่โด่งดังแล้ว เรายังมีเฉดสีโมเดิร์นคลาสสิก ได้แก่ สีดำด้าน (Matte Black), สีเทาดำ (Gunmetal) และสีเงินด้าน (Brushed Silver) ทุกสีเคลือบด้วยนวัตกรรมพรีเมียม วิธีทำความสะอาดคือใช้ผ้าชุบน้ำสบู่หรือน้ำยาล้างจานสูตรอ่อนโยนเช็ด ห้ามใช้น้ำยาล้างห้องน้ำที่มีกรดเด็ดขาด
“อยากติดก๊อกน้ำฝังผนัง แต่กลัวท่อรั่ว-ต้องทุบตึก? รวมวิธีป้องกันและเคล็ดลับที่ช่างไม่เคยบอกคุณ”
ความกลัวเรื่อง “การติดตั้งก๊อกน้ำหรือเรนชาวเวอร์แบบฝังผนัง” เป็น Pain Point ใหญ่ของคนไทยจริง ๆ ค่ะ เพราะพฤติกรรมคนไทยจะกังวลเรื่องความยุ่งยากในระยะยาว โดยเฉพาะความคิดที่ว่า “ถ้าเกิดปัญหาขึ้นมา…ต้องทุบกำแพงอย่างเดียว”
1. เจาะลึก 3 Pain Points หลักของคนไทย
- กลัวการรั่วซึมใต้ผนัง กลัวว่าวันดีคืนดีท่อจะแตกหรือซึมอยู่ข้างใน กว่าจะรู้ตัวกำแพงก็บวม กระเบื้องร่อน และต้องรื้อห้องน้ำทำใหม่
- กลัวต้องทุบกำแพงเวลาซ่อมบำรุง คิดว่าถ้าเซรามิกวาล์วเสีย หรือก๊อกน้ำหยด จะไม่สามารถเปลี่ยนอะไหล่เฉพาะจุดได้เหมือนก๊อกลอยทั่วไป ต้องทุบสถานเดียว
- กลัวช่างไทยไม่มีมาตรฐาน/ติดตั้งเบี้ยว ก๊อกฝังผนังต้องการความแม่นยำสูงมาก หากช่างฝังลึกเกินไป ฝาครอบก็ปิดไม่มิด หรือถ้าฝังตื้นเกินไป ก๊อกก็ยื่นออกมาไม่สวย
2. แนวทางการแก้ปัญหา (How to Solve)
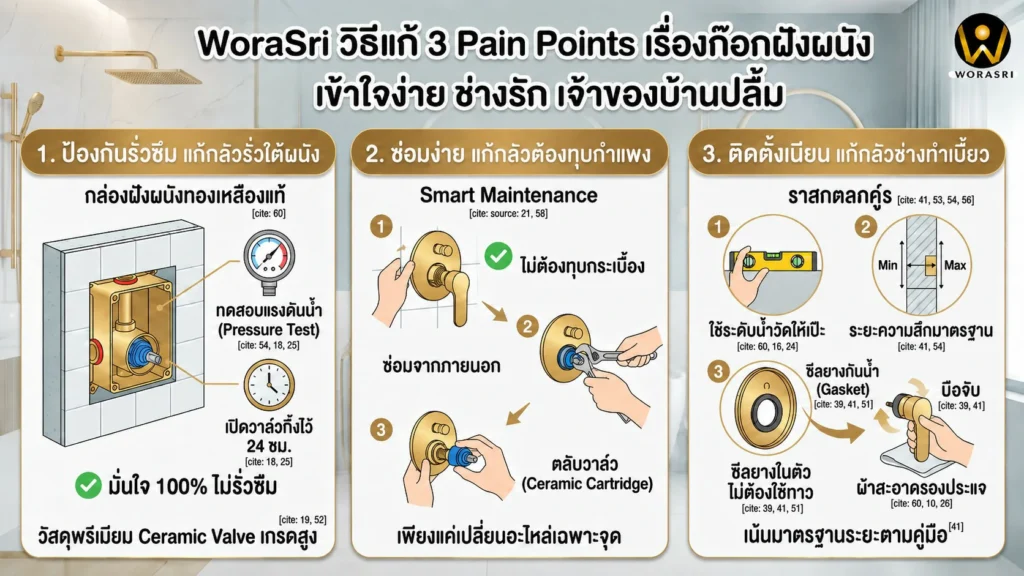
แก้ Pain Point: “กลัวรั่วซึม” ชูโรงด้วยขั้นตอน Pressure Test และวัสดุพรีเมียม
- “การทดสอบระบบน้ำ (Pressure Test)”: เราสามารถป้องกันการรั่วซึมได้ 100% ก่อนปิดผนัง โดยการอุดปลายท่อและเปิดวาล์วน้ำทิ้งไว้ 24 ชั่วโมงเพื่อเช็กจุดซึมตามข้อต่อ หากผ่านขั้นตอนนี้ไปได้และเทปูนปิดทับ ก็หมดห่วงเรื่องรั่วซึมยาวนานนับสิบปี
- ตอกย้ำความทนทานของวัสดุ WoraSri: สินค้าทำจาก ทองเหลืองแท้หนาพิเศษ ที่ทนแรงดันน้ำสูง ไม่เป็นสนิม และใช้ Ceramic Valve มั่นใจว่าโอกาสที่ตัววาล์วข้างในจะพังนั้นยากมาก
แก้ Pain Point: “กลัวต้องทุบกำแพงเวลาซ่อม” ฟังก์ชัน Smart Maintenance (ซ่อมจากภายนอก)
- ลบความเชื่อเก่า ๆ คนไทยส่วนใหญ่ไม่รู้ว่า ก๊อกฝังผนังและชุดวาล์วเรนชาวเวอร์ยุคใหม่ ออกแบบมาให้สามารถ “เปลี่ยนตลับวาล์วจากด้านหน้าได้เลย” แค่ถอดมือจับเปิด-ปิดน้ำ / ถอดฝาครอบวาล์วออก / นำประแจมาไขเปลี่ยนตลับวาล์วอันใหม่เข้าไปได้ทันที โดยไม่ต้องทุบกระเบื้องแม้แต่แผ่นเดียว!
แก้ Pain Point: “กลัวช่างติดตั้งไม่เป็น/ทำพัง” ซัพพอร์ตด้วยคู่มือและทริคระดับโปร
- คู่มือและวิดีโอ Step-by-Step ภาษาไทยที่เข้าใจง่าย สุขภัณฑ์ฝังผนังมักจะมีระยะมาตรฐาน (เช่น ระยะ Center-to-Center 150 มม. สำหรับก๊อกผสม) WoraSri ทำคู่มือที่ระบุระยะความลึกต่ำสุด-สูงสุดในการฝังท่อให้ชัดเจน เพื่อให้ลูกค้ายื่นให้ช่างดูหน้างานได้ทันที
- ทริคการติดตั้งเพื่อความเนียนระดับ Luxury: * แนะนำการใช้ ระดับน้ำ (Spirit Level) วัดให้เป๊ะก่อนเทปูนปิด
- ความรู้เรื่องฝาครอบวาล์ว (Plate/Trim) ของ WoraSri ว่ามี ซีลยางกันน้ำ (Gasket) ในตัว เมื่อประกอบมือจับแล้วจะแนบสนิทกับกระเบื้องโดยอัตโนมัติ ไม่จำเป็นต้องใช้กาวทาเลอะเทอะ
- เตือนช่างให้ใช้ ผ้าสะอาดรองประแจเลื่อน ขณะขันน็อตหน้ากาก เพื่อป้องกันผิวเคลือบพรีเมียม (เช่น PVD Gold, Matte Black หรือ Gunmetal) เป็นรอยขีดข่วน
สรุปและช่องทางการสั่งซื้อ วิธีติดตั้งก๊อกน้ำฝังผนัง
การติดตั้งก๊อกน้ำฝังผนัง WoraSri รุ่น BF31, BF311 และ BF312 ไม่ใช่เรื่องยากหากช่างเข้าใจระยะการฝังบล็อกวาล์วและการตัดปลอกพลาสติกอย่างถูกวิธี การลงทุนกับวัสดุทองเหลืองแท้และระบบฝังผนังที่มีมาตรฐานจะช่วยให้ห้องน้ำของคุณสวยหรู ทนทานยาวนานนับสิบปี
สัมผัสความหรูหราเหนือระดับในห้องน้ำของคุณวันนี้ หากคุณกำลังมองหาสุขภัณฑ์พรีเมียมสีทอง สีดำ สีเทาดำ หรือสีเงิน สามารถปรึกษาทีมงานผู้เชี่ยวชาญของ WoraSri เพื่อเลือกเฉดสีที่ใช่สำหรับบ้านคุณ
- Line Official: @WoraSri
- Website: www.worasri.com
How to Install a Wall Mounted Faucet: WoraSri BF31, BF311, BF312 Professional Installation Guide
Upgrading your bathroom with a concealed basin faucet (wall-mounted faucet) is the ultimate way to achieve a clean, sleek, and luxury minimalist aesthetic. However, the key to ensuring a flawless, leak-free performance and perfect spout alignment depends entirely on precise valve embedding.
In this guide, WoraSri provides a step-by-step technical walkthrough for installing our premium wall-mounted faucet models: BF31, BF311, and BF312, from rough-in plumbing to final trim kit assembly.
Essential Tools and Crucial Pre-installation Steps
Before chipping away at the concrete wall, ensure you have the following tools ready:
- Spirit Level: Critical to ensure the embedded valve block is perfectly straight.
- PTFE Thread Seal Tape: For securing all threaded water inlet connections.
- Plastic Sleeve Cutter / Utility Knife: For trimming the protective housing cover.
- Clean Soft Cloth: To wrap around your adjustable wrench, preventing scratches on luxury finishes like PVD Gold, Matte Black, Gunmetal, or Brushed Silver.
Important Warning: Always flush the water supply lines thoroughly before connecting the brass valve body to clear out any sand, debris, or gravel. This prevents internal ceramic cartridge blockage and potential leakage.
Step 1: Rough-in Piping and Embedding the Valve Box
The WoraSri BF312 and BF311 series come equipped with a protective Embedded Box system to safeguard the solid brass valve body inside and guide the masonry process.
1.1 Setting the Embedding Depth
- Refer to the indicator markings (MIN / MAX) labeled on the protective plastic sleeve.
- The standard required embedding depth ranges between 55 mm and 70 mm from the raw brick/concrete wall surface to the final finished tile surface.
- Use a spirit level to verify that the box is aligned perfectly on both vertical and horizontal axes, then anchor it securely using plugs and screws.
1.2 Connecting Inlets and Conducting a Pressure Test
- Connect the Cold Water line to the right inlet (Blue indicator) and the Hot Water line to the left inlet (Red indicator).
- Crucial Step – Pressure Test: Turn on the water main and leave the system pressurized for at least 24 hours to inspect all concealed threaded joints for leaks before sealing the wall with mortar and laying the tiles.
Step 2: Trimming the Protective Shield and Trim Kit Assembly
Once the tiling work is complete, the protective plastic housing will protrude from the wall. Follow these steps for a flush finish (per the BF312 design profile):
2.1 Trimming the Protective Shield
- Using a sharp utility knife or mini hacksaw, carefully cut the protruding plastic shield so it sits perfectly flush with the finished tile surface.
2.2 Installing the Trim Plate, Spout, and Handle
- Wrap the brass connector nipple with PTFE tape and screw it firmly into the internal water outlet.
- Slide the Trim Plate over the assembly. WoraSri trim plates feature built-in waterproof rubber gaskets (seals). Therefore, applying construction adhesive or nail-free glue to the tiles is not necessary. The mechanical pressure from assembling the spout and handle will hold the plate securely flush against the wall.
- Pro Tip: If the tile has a heavy texture, apply a very thin bead of clear silicone around the rim of the plate to prevent any external splash water from seeping behind the wall.
- Connect the Spout and the Control Handle to the valve stems. Securely tighten the small grub screws underneath to lock them into position.
FAQ: Wall Mounted Faucet Installation Troubleshooting
- Q: What is the ideal installation height for a wall-mounted faucet?
- A: Standard practice dictates that the spout should sit approximately 15 – 20 cm above the top rim of your washbasin. This provides adequate handwashing clearance while minimizing water splashes.
- Q: If the valve leaks in the future, do I need to break the bathroom tiles to fix it?
- A: Absolutely not. WoraSri faucets feature an engineered Embedded Box. By simply removing the external handle and trim plate, you can access and replace the ceramic cartridge directly from the front of the wall.
- Q: Are these models available in colors other than gold?
- A: Yes! While our Brushed Gold is highly popular, we offer a complete modern collection including Matte Black, Gunmetal, and Brushed Silver. All feature advanced premium coatings. Clean them using soft cloths with mild dish soap; never use acid-based cleaners.
Conclusion & Call to Action
Installing WoraSri wall-mounted faucets like the BF31, BF311, and BF312 ensures a clean, luxurious finish when proper attention is paid to embedding depth and precise sleeve trimming. Investing in solid brass infrastructure protects your home from hidden leaks while elevating your bathroom design.
Bring Understated Luxury into Your Home Discover our full range of premium concealed faucets in Gold, Matte Black, Gunmetal, and Brushed Silver. Contact our specialist team for personalized assistance.
- Line Official: @WoraSri
- Website: www.worasri.com
สั่งซื้อสินค้า คลิก ติดต่อสั่งซื้อ
สอบถามข้อมูลเพิ่มเติมหรือสั่งซื้อได้ที่
LINE OFFICIAL: พิมพ์หรือคลิกที่นี่ @Worasri
ติดตามความเคลื่อนไหวและอัพเดทข่าวสารได้ที่
Facebook : https://bit.ly/353Eu4p
Instagram : https://bit.ly/2xJqFMB
1 thought on “วิธีติดตั้งก๊อกน้ำฝังผนัง WoraSri ฉบับมืออาชีพ”
Comments are closed.